Usage
This section gives a tutorial of the main functionality of Spyke Viewer. To follow the examples, you need to download and unpack the sample data file: https://github.com/downloads/rproepp/spykeviewer/sampledata.zip. It contains simulated data for two Tetrodes over 4 Trials. For each tetrode, there are 5 simulated neurons with corresponding spike trains and template waveforms included.
When you start Spyke Viewer for the first time, you will see the following layout:
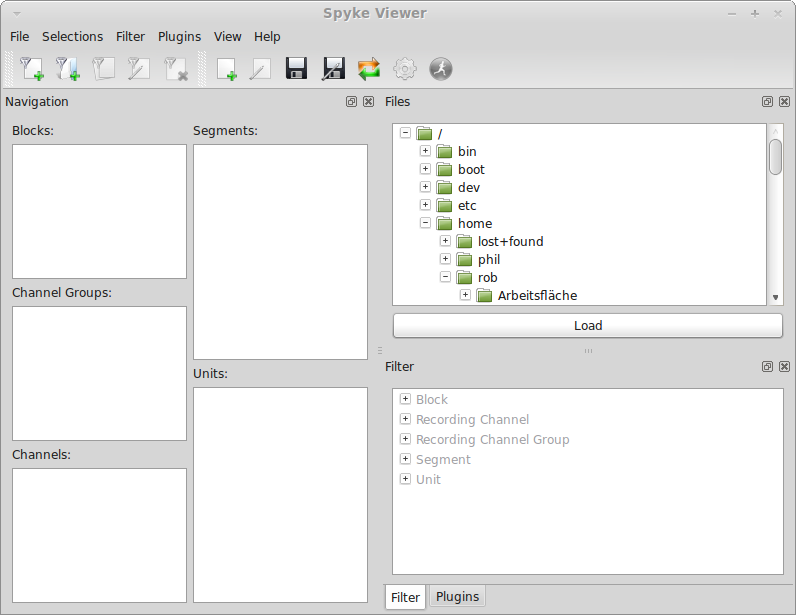
All elements of the user interface are contained in docks and can be rearranged to suit your needs. Their layout is saved when you close Spyke Viewer. The “View” menu shows all available docks and panels, you can also hide and show them from this menu.
Loading Data
The first thing you want to do when using Spyke Viewer is to load your data. The Files dock contains a view of all the files on your system. You can use it to select one or more files, then click on the “Load” button below to load the selected files into Spyke Viewer. For each selected file, the filetype is selected automatically from the extension (folder-based formats are currently not supported). For now, find and select the file “sample.h5” that you just unpacked (an HDF5 File) and load it.
The data file input/output is based on neo and supports most of the formats that have a Neo IO class. If you want to use a file format that is not supported by Neo, you can write a plugin: IO plugins.
Selections
Now that a file was loaded, some entries have appeared in the Navigation dock. To understand how to navigate data with Spyke Viewer, you need to know the Neo object model. The following picture is a complete representation:
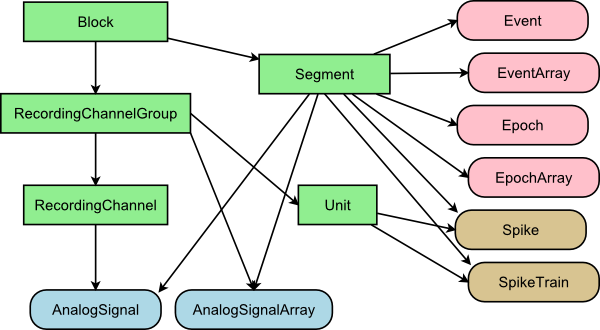
The rectangular objects are containers, rounded corners indicate a data object. The arrows represent a “contains zero or more” relationship. Note that all data objects belong to a segment and some also belong to other objects. For example, a SpikeTrain is referenced by both Segment and Unit. A unit often represents a single neuron (it is named unit because putative neurons from spike sorting are called units), but it could also represent the results of a spike detection algorithm and therefore include multiple neurons. Each SpikeTrain is specific to one Segment and one Unit, and each Segment or Unit could contain many SpikeTrains. For more detailed information on the Neo object model, see the Neo documentation.
In Spyke Viewer, you use the Navigation dock to select container objects. There is a list for each type of container where you can select an arbitrary set of entries. You can select multiple entries by clicking and dragging or using the control key when clicking. Each list will only show those objects of the respective type that are contained in select objects further up in the hierarchy. For example, try selecting a different recording channel group and observe how the channels and units list change.
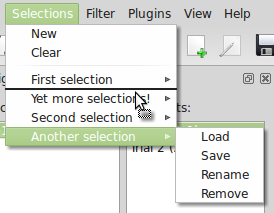
The sets of selected objects from all container types is called a selection. The selected items you see in the Navigation dock are called the current selection. Selections determine which data will be analyzed by plugins (see Plugins) and can be accessed by the internal console (see Using the Console). You can save a selection using the “Selections” menu: Click on the menu and then on “New”. An additional entry in the “Selections” menu called “Selection 1” will appear. Each selection entry has a submenu where you can load, save, rename or delete the selection. Try selecting something else in the Navigation dock and creating a new selection again. Now try to load your first selection and observe how the Navigation dock changes to reflect what you have loaded. If you use the entry “Save” from a selection, it will be overwritten with the current selection. You can also change the order of the saved selections by dragging the entries in the “Selections” menu:
All saved selections together with the current selection are called a selection set. You can save your current selection set as a file (in JSON format, so it can easily be read and edited by humans or other software) using “Save Selection Set...” in the “File” menu. When you load a selection set, your current selection is replaced by the current selection from the file. The other selections in the file are added to your current saved selections. If a selection set includes files that are not currently loaded, they are opened automatically. When you exit Spyke Viewer, your current selection set is saved and will be restored on your next start.
Filters
When dealing with large datasets, it can be inconvenient to create a selection from the full lists of containers. The filter system provides a solution to this problem. By creating filters, you can determine what objects are shown in the Navigation tab. For example, you might want to temporarily exclude RecordingChannelGroups that have no attached units or only display Segments with a certain stimulus. Creating filters requires basic knowledge of Python and the Neo object model.
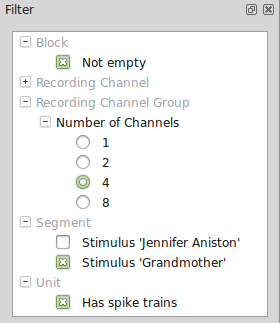
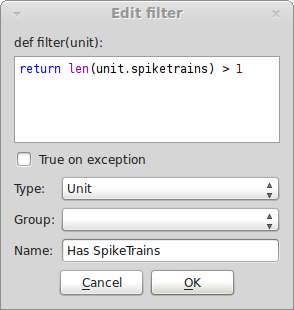
You can manage your filters with the Filter dock and toolbar (which is positioned on the upper left in the initial layout). When you start Spyke Viewer for the first time, the Filter dock will be empty. You can create a new filter by clicking on “New Filter” in the toolbar (right-clicking the Filter dock also brings up a menu with available actions). You can choose what kind of container objects the filter applies to, the name of the filter and its content: a Python function that returns True if an object should be displayed and False if not. The signature of the function is fixed, so you only have to write the body. The “True on exception” checkbox determines what happens when the filter function raises an exception: If it is checked, an exception will not cause an element to be filtered out, otherwise it will. The following picture shows how you would create a filter that hides all units that do not have at least two SpikeTrains attached:
You can also create filter groups. They can be used to organize your filters, but also have an important second function: You can define groups in which only one filter can be active. If another filter in the group is activated, the previously active filter will be deactivated. You can choose which filters are active in the Filter dock. The Navigation dock will be updated each time the set of active filters changes. You can also drag and drop filters inside the Filter dock. All your filters and their activation are saved when you exit Spyke Viewer.
Using Plugins
Once you have selected data, it is time to analyze it. Spyke Viewer includes a number of plugins that enable you to create various plots from your data. Select the Plugins dock (located next to the Filter dock in the initial layout) to see the list of available plugins. To start a plugin, simply double-click it or select it and then click on “Run Plugin” in the plugin toolbar or menu. You can also start a plugin in a different process (so that you can continue using Spyke Viewer while the plugin is busy) by selecting “Start with Remote Script” in the “Plugins” menu.
For example, if you start the “Signal Plot” plugin, it will create a plot of selected analog signals. Try selecting Segment 3, Tetrode 2 and Channels 3 and 4. When you now start the plugin, you will see the signals of the selected channels in Segment 3. Now select some units and then open the plugin configuration by clicking on “Configure Plugin” on the plugin toolbar or menu. Select “Show Spikes” and set “Display” to “Lines”. When you now start the plugin, you will see the analog signals and the spike times of your selected units. Go to the configuration again, set “Display” to “Waveforms” and check “Use first spike as template”. After another run of the plugin, you will see the template spike waveforms overlaid on the analog signals. To learn more about the included plugins and how to use them, go to Plugins.
Using the Console
With the integrated console, you can use the full power of Python in Spyke Viewer, with access to your selected data. Open the Console dock by clicking on the “View” menu and selecting “Console”. You can explore your workspace using the Variable Explorer dock and view your previous commands with the Command History dock. Some packages like scipy and neo are imported on startup, the message in the console shows which. The console features autocompletion (press the Tab key to complete with the selected entry) and docstring popups.
The most important objects in the console environment are current and selections. current gives you access to your currently selected data, selections contains all stored selections (which you can manage using the “Selections” menu, see selections). For example,
>>> current.spike_trains()
gives a list of your currently selected spike trains. Both current and the entries of selections are spykeutils.plugin.data_provider.DataProvider objects, refer to the documentation for details of the methods provided by this class.
As an example, to view the total amount of spikes in your selected spike trains for each trial, enter the following lines:
>>> trains = current.spike_trains_by_segment()
>>> for s, st in trains.iteritems():
...     print s.name, '-', sum((len(train) for train in st)), 'spikes'
Note that the variables used in these lines have now appeared in the Variable Explorer dock.
Settings
The Spyke Viewer settings can be accessed by opening the “File” menu and selecting “Settings” (on OS X, open the “Spyke Viewer” menu and select “Preferences”). You can adjust various paths in the settings:
- Selection path
- The path where your selections are stored when you exit Spyke Viewer. This is also the default directory when using “Save Selection Set...” or “Load Selection Set..” in the “File” menu.
- Filter path
- The directory where your filter hierarchy and activation states are stored when you exit Spyke Viewer. Your filters are stored as regular Python files with some special annotation comments, so you can edit them in your favourite editor.
- Data path
- This directory is important when you are using the data storage features of spykeutils.plugin.analysis_plugin.AnalysisPlugin.
- Remote script
- A script file that is executed when you use “Start with remote script” action for a plugin. The default script simply starts the plugin locally, but you can write a different script for other purposes, e.g. starting it on a server.
- Plugin paths
These are the search paths for plugins. They will be recursively searched for Python files containing AnalysisPlugin classes. Subdirectories will be displayed as nodes in the Plugins dock.
In addition, your IO plugins also have to stored be in one of the plugin paths. The search for IO plugins is not recursive, so you have to put them directly into one of the paths in this list.
![]()
Project Versions
RTD Search
Full-text doc search.